Customizable Anti-fatigue Flooring Tiles – Design, Installation & Maintenance
Design
Our anti-fatigue flooring tiles feature an innovative beveled overlapping design that enables simple installation without the need for professional tools. Each tile has two sides with male beveled edges and two sides with female beveled edges. By interlocking the protruding and recessed corners of adjacent tiles, the surface aligns precisely, creating a flat and even finish. When the tiles are positioned, peel off the protective film on the self-adhesive tape on the beveled edge. The adhesive will then securely bond the overlapping edges of each tile, combining all tiles into a flat, fully assembled mat. This interlocking mechanism allows the quick installation of a customized mat with a smooth, seamless surface that appears as a single piece construction. Such a convenient design greatly supports the vision of making mat installation more DIY-friendly.
At Pro-Pad, carpet pad manufacturer expertise is integrated into the product structure design, ensuring consistent support, comfort performance, and stability across different flooring environments.
By means of the beveled overlapping connection, each tile is tightly secured to the adjacent ones, eliminating gaps, uneven load distribution, and compression-related deformation at the seams. This allows the assembled mat to provide optimal performance while ensuring safety, comfort, and long-term durability.
Installation
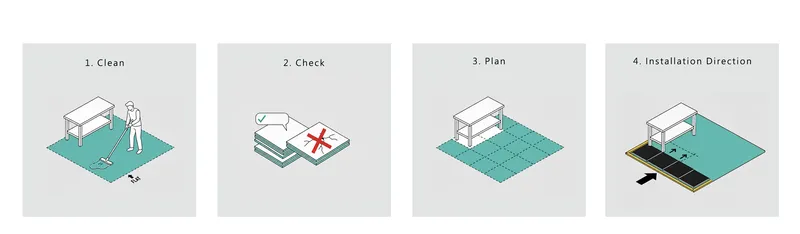
Preparation
- Clean the floor thoroughly to ensure the floor is clean and dry.
- Check the quantity and quality of the tiles.
- Plan the layout: determine the shape and size of the modular area based on your actual needs.
- Plan the installation direction: It’s recommended to start from the edge and keep all tiles aligned with the same orientation of male and female beveled edges to achieve full coverage of the work area.
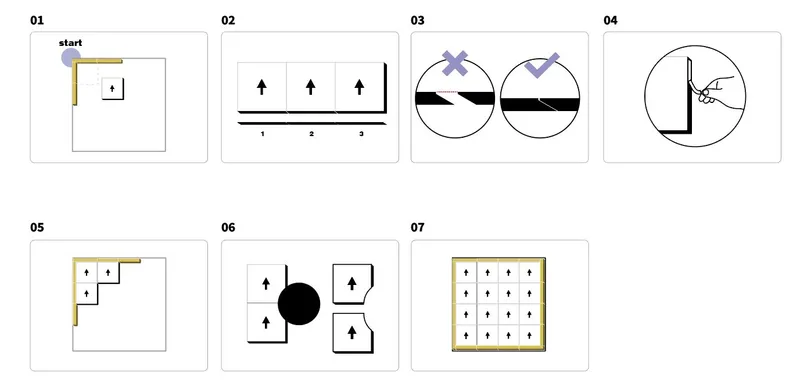
Installation Steps
- Start from the edge and position the first tile, keeping the edges aligned.
- Insert the male beveled edge of the next tiles into the female beveled edge of the first tile.
- Check that the corner interlocks underneath each tile are properly engaged with the adjacent tiles.
- Peel off the protective film from the self-adhesive tape on the beveled edges and press the tiles firmly together.
- Continue installing the remaining tiles in sequence to create the desired modular area in the required size and shape.
- If cutting is needed, use a utility knife along the straightedge or follow a curve to trim the tile.
- Edge trims can be installed around the perimeter to enhance safety and provide a clean, finished look.
Cleaning & Maintenance
- Industrial Anti-fatigue Flooring Tiles
.Routine Cleaning: Wipe with a damp cloth or mop to remove dust and dirt.
.Stain Removal: For oil stains or other marks, use a neutral cleaner and wipe clean, then dry with a cloth.
.Do not use bleach or strong acidic/alkaline cleaners to prevent damage to the tiles.
- Carpeted Flooring Tiles
.Routine Cleaning: Use a vacuum cleaner or broom to remove dust and dirt.
.Spot Cleaning: Wipe stains with a slightly damp cloth or sponge; avoid over-soaking the carpet surface.
.Use a neutral cleaner when necessary. Wipe gently and dry immediately with a clean cloth.
.Do not use bleach, acidic/alkaline cleaners, or stiff brushes to prevent damaging the carpet fibers.
Pro-Pad applies carpet pad manufacturer know-how to carpeted flooring tile structure design, helping maintain surface resilience and reduce fiber fatigue under long-term use.
Replacement & Inspection
- Regularly inspect the connection to ensure the tiles remain flat and secure.
- If any tile is damaged or heavily stained, you may remove and replace the individual tile without replacing the entire area.
- When removing or replacing tiles, handle them carefully to avoid damaging adjacent tiles or the beveled edges with adhesive. If necessary, gently heat the seams (for example, using a hair dryer) to help separate the pressure-sensitive adhesive without damaging the tile surface.